There is no doubt that WordPress is one of the best blogging platforms, and Shopify is the most popular eCommerce platform on the market today. But how do you seamlessly combine them both for blogging and eCommerce?
This guide will take you through how to integrate WordPress with Shopify step-by-step, allowing you to keep your blog and store under the same URL. Doing so will make your website look more professional and improve the user experience for your customers. By the end of this guide, you’ll have a streamlined online presence that’s sure to impress your customers and improve your SEO!
Disadvantages of hosting a blog on a subdomain
Before diving into how we can accomplish this, let’s begin by going over why you should not host your WordPress blog in a subdomain.
Duplicate SEO Efforts
Choosing to host a blog as a subdomain (e.g., blog.mysite.com) presents several SEO challenges.
First, search engines like Google treat subdomains as separate entities from the main domain (e.g., mysite.com).
Second, managing two domains necessitates duplicate SEO efforts for each, including building authority and backlinks independently, which can dilute the SEO impact on the main site and complicate analytics.
Incoherent User Experience
Additionally, using a subdomain can create a disjointed user experience (UX), as visitors are forced to navigate between two different URLs, potentially undermining the cohesive brand experience and making the user journey more complex.
Benefits of Hosting a Blog in a Subdirectory / Subfolder
On the other hand, hosting a blog in a subdirectory (e.g., mysite.com/blog) offers significant advantages for SEO.
It allows the blog to benefit from the main site’s established domain authority, making it easier for blog posts to rank well in search results. This setup simplifies link-building efforts since backlinks earned by the blog directly contribute to the main site’s link profile, enhancing its overall SEO strength.
Unlike the skewed analytics of a blog as a subdomain, unified analytics become possible when your blog is in a subdirectory, providing a clearer picture of overall performance and user behavior without the need for separate tracking.
Now that we know the benefits of using a subdirectory or subfolder for your blog let’s look at how to accomplish this on Shopify.

Understanding the Shopify Proxy App and WordPress Integration
With some technical knowledge, WordPress can be integrated with Shopify by using the Shopify Proxy App, which acts as a bridge, allowing content from your WordPress blog to be displayed within your Shopify store’s URL structure.
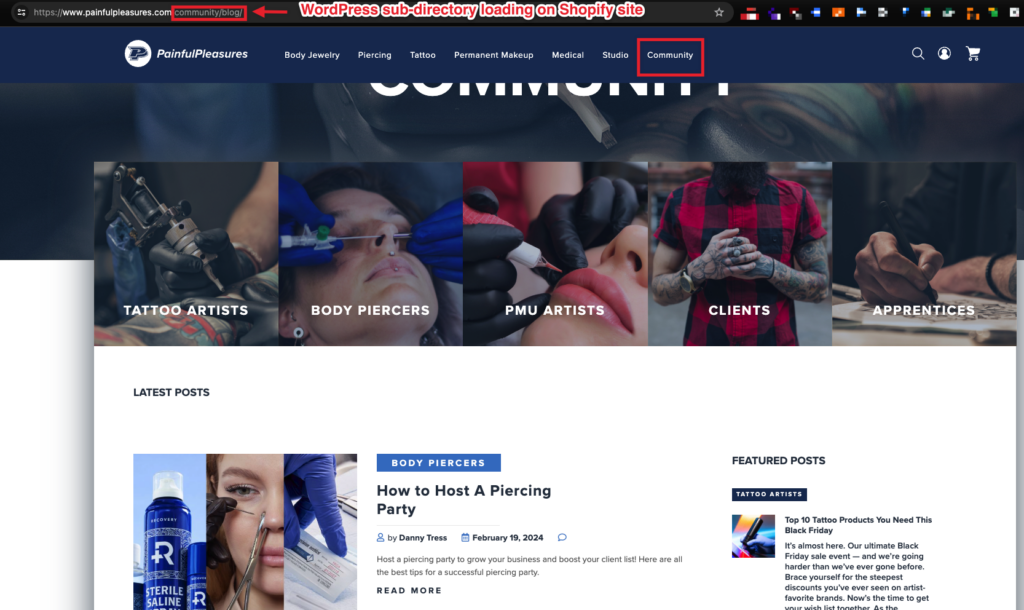
A great example of Shero recently implementing this functionality (integrating WordPress with Shopify) is the Painful Pleasures website. They have maintained their blog on WordPress while keeping the eCommerce operations on Shopify.

Using the Shopify Proxy App, you can now present your blog as if it’s part of your main Shopify URL, like mysite.com/blog. Your visitors will be able to seamlessly navigate between your store and your blog without ever leaving your main domain. Thus, creating a more streamlined and cohesive experience for your visitors can help increase your site’s engagement and conversions.
Setting Up the Shopify + WordPress Integration: A Step-by-Step Guide
To set up the integration in Shopify, you’ll first have to create a Shopify Proxy App by following these steps:
Navigate to your Shopify Partner Dashboard and create a new app by going to Apps and creating the app manually.
*Note – only a Shopify Partner Agency like Shero can create and publish apps on a store. You will have to have your development agency create the app for you.

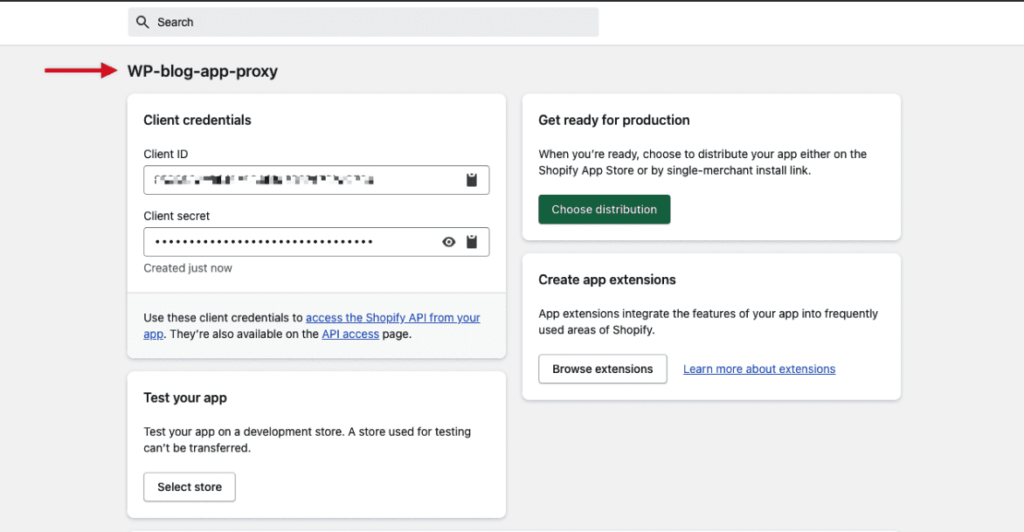
Enter the App Name naming it appropriately, e.g., “WP-blog-app-proxy.”

This is the app we created:

Choose “Custom Distribution” for the app to ensure it is only available to your store.
There are two options to distribute your app:
Public Distribution – Publish your app as listed or unlisted on the Shopify App Store. This option enables you to reach a global merchant audience with unlimited installs.
Custom Distribution – Your app can be installed by a single store or Plus organization. This option allows you generate custom install links for one store or one Plus organization. Installs are limited to one store or an organization’s number of stores.
In this use case, we’d want to use custom distribution.
Add your Shopify store name to the app settings, linking the app exclusively to your Shopify environment. This app will only be available to install on stores that are part of the same Plus organization.
Configuring the Proxy Settings
In the app settings, go to “App Proxy” and set the desired subpath, typically “blog,” for your WordPress content to reside under.

Specify the proxy URL, which should be your WordPress blog address followed by the designated subpath, e.g., https://blog.mysite.com/community/blog.
Here are the steps in order:
- In your app settings, navigate to ‘App Proxy’.
- Under ‘Subpath Prefix’, choose ‘community’.
- Set ‘Subpath’ to ‘blog’.
- For ‘Proxy URL’, input your WordPress base URL followed by your chosen path, e.g., ‘https://info.yourblog.com/community/blog’.
- Click ‘Save’
Technical Steps from the Comand Line
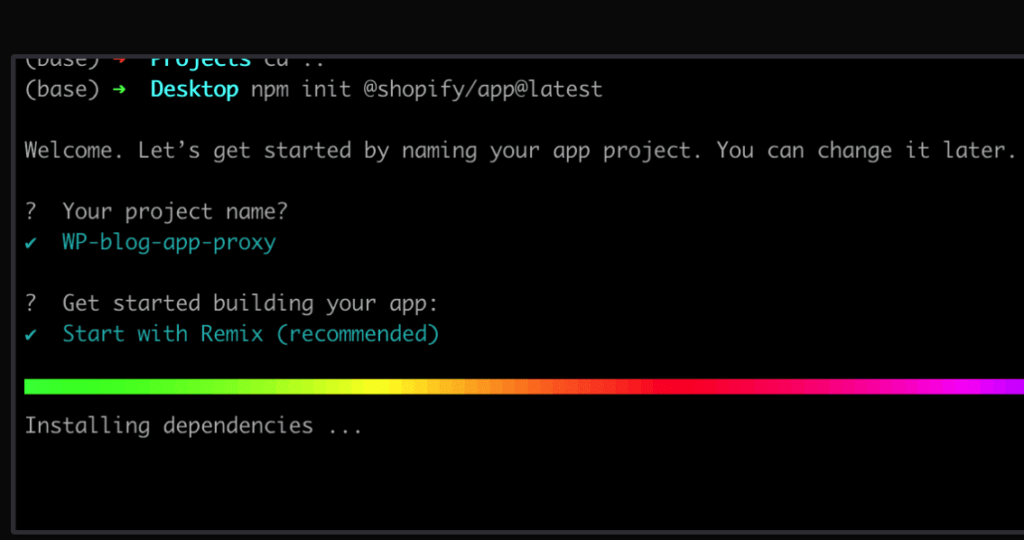
To get started with the app, you need to choose a name for it and it will automatically install the dependencies. Open terminal and run:
npm init @shopify/app@latest
To view the app, run the command:
`npm run dev` on your terminal.
You will be prompted to connect with your Shopify partners account, so make sure to have that ready.
Additionally, you will also need to associate the project with an app.
You can choose to either create a new app or connect with an existing one. In this case, we select the option to connect with the existing app “WP-blog-app-proxy” which was manually created earlier.
Next, you’ll be asked to select a store to view your project. You can choose any project you want for this.
Finally, you’ll be asked whether you want Shopify to automatically update your app’s URL in order to create a preview experience. Choose “Yes” to this option.
Once you’ve completed these steps, go to the WP-blog-app-proxy app in the partner portal and navigate to the “Distribution” section.
There, you can copy the link, which you can use to install the app. Once the app is installed, you should be able to use the Proxy.
Pages starting with https://www.mysite.com/community/blog/ will automatically pull content from the equivalent URL on the WordPress site.
Technical Setup on the WordPress Side
Thus far, we have created the proxy app in Shopify. Now we need to do some WordPress configurations. One of the main ones is to update your WordPress configuration to handle cross-origin resource sharing (CORS) and ensure that assets (CSS, JS, images) are properly loaded through the Shopify domain. Otherwise, fonts will not load because of the CORS Policy.
To get around this issue, add the following code to your WordPress theme’s functions.php file to handle cross-origin requests:
if (isset($_SERVER['HTTP_ORIGIN'])) {
  if ($_SERVER['HTTP_ORIGIN'] == 'https://www.painfulpleasures.com') {
      header("Access-Control-Allow-Origin: {$_SERVER['HTTP_ORIGIN']}");
      header("Access-Control-Allow-Methods: POST, GET, OPTIONS, PUT, DELETE");
      header("Access-Control-Allow-Credentials: true");
      header('Access-Control-Allow-Headers: Origin, X-Requested-With, X-WP-Nonce, Content-Type, Accept, Authorization');
  }

  // Handle OPTIONS request
  if ($_SERVER['REQUEST_METHOD'] == 'OPTIONS') {
      status_header(200);
      exit();
  }
}
This snippet ensures that your WordPress site can respond to requests from your Shopify domain without CORS errors.
If CSS/JS files do not load properly from WordPress to the proxy, users will see broken pages without styling or pages that are unclickable. We will load the CSS/JS and images from Shopify to resolve this. This can be done by taking these two steps:
- Create a symlink on the server.
- Update the static URL on wp-config.php
This way, we are not loading the static files from blog.mysite.com but from the proxy instead.
The last step is to modify the following function in functions.php on the WordPress site:
function replace_text($text) {
return str_replace('https://blog.mysite./wp-content', 'https://www.mysite.com/community/media/wp-content', $text);
}
add_filter('the_content', 'replace_text');
SEO Workarounds
To prevent Google from indexing the blog.mysite.com content, we needed to add noindex, nofollow to the blog.mysite.com and add index, follow to the mysite.com/community/blog. Remember, both sites use the same instance. The information is pulled from blog.mysite.com and it shows under mysite.com/community/blog via the Shopify proxy app we have created.
Noindex / Nofollow Workaround
We add this code on header.php in WordPress:
  <script>
        if(window.location.href.includes('https://blog.mysite.com/')) {
            let metaRobots = document.querySelector('meta[name="robots"]');
            metaRobots.setAttribute('content', 'noindex, nofollow');
        }
</script>
Canonical URLs Workaround
To take care of any canonical URL issues, you can use this script which updates the base URL from blog.mysite.com to mysite.com:
 <script>
        let canonicalLink = document.querySelector('link[rel="canonical"]');
        let href = canonicalLink.href;
        let baseURL = 'https://blog.mysite.com';
        let newHref = href.replace(baseURL, 'https://www.mysite.com');
        link.setAttribute('href', newHref);
    </script>
Sitemap Workaround
When generated, the sitemap for the WordPress blog usually includes the WordPress base URL. In our case, this would be blog.mysite.com/example-url.
However, we do not want Google to crawl the domain blog.mysite.com in the sitemap. The sitemap is usually a generated file in XML structure, which can be easily modified to meet our needs. In this case, we replace the base URL from our blog, blog.mysite.com, with our Shopify URL, mysite.com/community/blog.
We want our XML file for the sitemap to be served from mysite.com. This can be accomplished by creating another proxy app.
You can follow the same steps as outlined above to create the sitemap proxy app or any other proxy app. Shopify allows you to build more than one proxy app. These come in handy when you want to hide (proxy) subpaths such as blog_category, tags, etc.
Here are the configurations for the Proxy app:
Subpath Prefix: community
SubPath: sitemap
Proxy URL: https://blog.mysite/community/sitemap.
Conclusion
Integrating your WordPress blog with your Shopify store provides a unified platform that leverages the strengths of both systems. By following the steps outlined in this guide, you can enhance your online presence, streamline user experience, and boost your SEO efforts. However, it’s important to be mindful of the technical and SEO implications to ensure a successful implementation.
If you need help integrating your Shopify store with WordPress, please don’t hesitate to contact us.
Frequently Asked Questions (FAQs)
How does the Shopify Proxy App work?
Shopify App Proxies allow Shopify apps to securely and efficiently serve data directly to Shopify shops from an external server. This is achieved by setting up a proxy URL that looks like it’s part of the Shopify store’s domain but is actually routed to the external server. This setup enables the display of dynamic content or the execution of custom logic without the need for the data to reside within Shopify’s infrastructure. The process involves configuring a subpath on the Shopify store that directs HTTP requests to the external server specified in the app’s settings.
Can I integrate multiple WordPress blogs with a single Shopify store?
Yes, it is possible to integrate multiple WordPress blogs with a single Shopify store. However, the integration process itself is more about managing multiple blogs within Shopify rather than directly integrating WordPress blogs into Shopify. Shopify allows for the creation of multiple blog instances within a single store, each potentially serving different content types or audiences. This setup can be beneficial for content segmentation and targeted marketing. The main challenge lies in managing content and ensuring consistent SEO and user experience across all blogs.
What are the limitations of using a Shopify proxy?
The primary limitations of using a Shopify proxy include potential speed issues and the inherent security considerations of exposing data through a proxy. A Shopify proxy can introduce latency, as observed with response times increasing significantly when data is fetched through the proxy compared to direct server access. This slowdown can affect user experience and page load times. Additionally, while proxies facilitate secure data exchange, developers must ensure that the exposed endpoints do not become vulnerabilities for data breaches or unauthorized access.
How do I handle SEO when integrating WordPress with Shopify?
Handling SEO for a Shopify store integrated with WordPress or multiple Shopify blogs requires a strategic approach to content management and site structure. Both Shopify and WordPress have their SEO capabilities, but the key is to ensure that the integration does not dilute SEO efforts. This involves maintaining clean, descriptive URLs, ensuring mobile optimization, and leveraging Shopify’s built-in SEO features like SSL certificates, 301 redirects, and canonical tags. For WordPress content, focusing on high-quality, keyword-rich content and optimizing for user experience are crucial. It’s also important to manage duplicate content issues and ensure that the Shopify and WordPress parts of the site are well-linked for seamless navigation.
Can I revert the integration if needed?
Reverting the integration of WordPress blogs with a Shopify store is technically possible but requires careful planning to minimize SEO and operational impacts. If you decide to separate the platforms after integration, you’ll need to consider how to handle URLs, content migration, and redirect strategies to preserve SEO value and user experience. It’s advisable to have a detailed rollback plan before initiating the integration, including backups of content and a clear understanding of how to manage the transition without losing data or negatively affecting your site’s search engine rankings.
Gentian, CSO and co-founder of Shero Commerce, guides the company and client digital strategies. He's an expert in technical SEO, Inbound Marketing, and eCommerce strategy.


