Selling on Facebook has become a viable part of the multichannel experience, as social media evolves to social commerce.
Here, we’ll cover the benefits of selling on Facebook, and how to connect Facebook to your Shopify store, including:
Table of contents
- Getting Started: Understanding Shopify’s Facebook Channel
- How to Install and Set Up the Facebook Channel on Shopify
- Make Your Products Available to Shopify’s Facebook Channel
- What is Facebook Shop, and How to Sell on Facebook
- How to Set Up Facebook Shop in the Shopify Facebook Channel
- Product Eligibility for Facebook Shop
- Customer Experience on Facebook Shop
- How to Set Up the Facebook Pixel on Shopify
- When to Use An Agency for Your Social Media Strategy

Getting Started: Understanding Shopify’s Facebook Channel
Because Facebook and Instagram are connected, Shopify’s Facebook channel lets you sell and advertise on both platforms, providing you with insights into performance and customers.
To start, in order to use the Facebook channel, you need to be on the Basic Shopify plan or higher and need a Facebook account. If you don’t have a Facebook account you’ll be prompted to sign up for one in order to install the Sales channel.
From there, your Facebook business page will be owned by a single Facebook Business Manager, although you can add admins later. To connect the Facebook channel in Shopify, you must be the admin of both the Facebook Business Manager that owns a specific Facebook page and the Facebook page itself.

Note: If you receive a notice that your store isn’t eligible for a sales channel, click “You can’t add this channel” to learn why.
How to Install and Set Up the Facebook Channel on Shopify
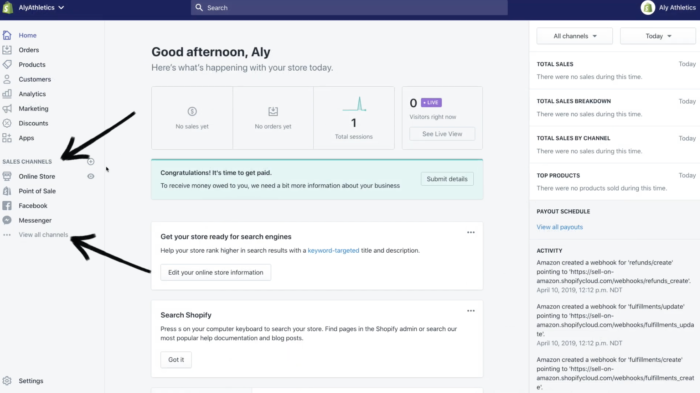
- From Shopify admin, click the + next to Sales Channels
- Click the + next to Facebook
- Select “Update Sales Channel” then “Start Set-Up”
- Click “Connect Account”
- Sign into Facebook
- Connect the required Facebook assets
- Accept the terms and conditions
- Click Finish setup.
Once the Facebook channel is set up, your Shopify products will sync to Facebook. From there, you can choose which products are available via the Product page, or by using the bulk editor in the Facebook channel.
When a product is available on the Facebook channel, it’s available to all of the features that you have set up in the Facebook channel. Meaning, you can’t make a product available to only one feature of the Facebook channel if you have multiple features set up.
For instance, if you have both Facebook Shop and Instagram Shopping set up, and you make a product available to the Facebook channel, it becomes available on Instagram Shopping, too.
Collections in Shopify, however, do not automatically sync to Facebook. You can create distinct collections for Facebook via the Facebook Commerce Manager.
Learn more about making the switch to Shopify.
Make Your Products Available to Shopify’s Facebook Channel
To view products available to the Facebook channel, go to your Shopify admin and click Facebook > Overview > View Products.
To begin adding products to your store, click Add Product.
If you already have products in your store that aren’t available to Facebook Shop, then click Make Products Available; this will bring you to the Products page in your admin.
From there:
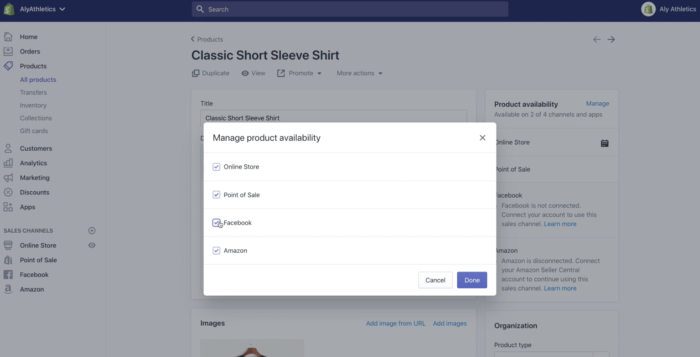
- Select the product that you want to make available to the Facebook channel.
- Click “Manage” in the Product Availability section of the product page
- Select “Facebook” and then click Done, then Save.

Product Images
Facebook crops image shapes to squares. For instance, if you have a landscape image, it’ll be reshaped. So, to ensure your product photos display properly, crop your images into squares that match Facebook’s template.
Product Status
The Product status section indicates if there are any errors with your product listings. You can browse a list of errors by clicking View Products.
To hide products: go to Shopify admin > Products > Collections.
- Select the product to hide
- On the Product Availability section, click Manage.
- Uncheck Facebook, click Done, then Save.
What is Facebook Shop, and How to Sell on Facebook
Display your Shopify products on your Facebook Page by using the Facebook Shop feature in the Facebook channel.
When you set up Facebook Shop, Facebook creates a Shop section on your Facebook Page. where Shopify products are displayed
How to Set Up Facebook Shop in the Shopify Facebook Channel
Steps:
- Install the Facebook Channel
- Select Facebook Shop
- If you have the channel installed and you activated another feature during setup, then you can find Facebook Shop on the Facebook channel’s Overview page.
- For those using Instagram Shopping, you can just click Activate in the Facebook Shop section of the channel Overview page.
- If you previously set up Facebook Marketing, you’ll have to connect a Facebook Commerce Manager account to the Facebook channel. Click Start Setup in the Facebook Shop section of the channel Overview page.
- Connect required assets.
- Accept Facebook’s terms.
Note: It can take up to 48 hours for Facebook to review your products and approve your store, but you’ll be notified.
If your store isn’t approved, then you can contact Facebook for details.
If Facebook Shop isn’t appearing on your Facebook Page, there may be an error on the channel in your Shopify admin.
Product Eligibility for Facebook Shop
To add a product for sale on Facebook Shop, the following requirements must be met, per Shopify it needs to:
- Be available to Facebook
- Require shipping, so it can’t be a digital product
- Have a return policy
- Have a product title that is less than 100 characters and not in all caps
- Include a product description and image
- Be eligible according to Facebook’s Commerce Policy and can’t be in violation of Facebook’s Community Standards
- Have a price; it can’t be free.
Customer Experience on Facebook Shop
After your account is verified, Facebook adds a Shop Now button to your main Facebook Page. This button links to the Shop section on your Page.
However, you can make changes to the button by linking it directly to a Shopify store.
Customer Inquiries
Customers can send direct messages via Messenger.
Or, contact you by email by using the Contact Seller button in Facebook. This forwards inquiries to the customer support email set up in your Shopify admin.
Checkout on Facebook
Selling on Facebook is easy from start to finish.
Customers are redirected to the product page in your Shopify store when they’re ready to checkout.
There, they can add the product to their cart and checkout or continue shopping.
Their order will appear on the Orders page in your Shopify admin as usual but will show up as referred from Facebook.
If you choose “Checkout on Instagram and Facebook” as the customer checkout method, rather than Checkout on your Shopify Store, customers can complete purchases without leaving Facebook.
How to Set Up the Facebook Pixel on Shopify
The Facebook pixel allows you to track customer data and behavior on your store, via the Facebook channel. It also helps improve your store’s marketing and ad performance.
You can decide how much data to track:
- Standard sharing: Only customer behavior
- Enhanced and Maximum settings: customer behavior and information including name, location, and email address.
You can create Facebook pixels via Facebook Ads Manager, or in the Facebook channel.
If you’ve added a previous Facebook pixel to your store’s theme code, you’ll need to remove that code after you set up your pixel using the Facebook channel.
Creating a Facebook pixel
Creating a pixel is easy. In the Facebook channel, click Create New in the pixel set-up box. Or, refer to the Facebook Help Center to learn how to create one via Facebook Ads Manager.
Adding a Facebook pixel to your online store
The Facebook pixel integrates with your online store and is optional to add when setting up Instagram Shopping, Facebook Shop, or Facebook Marketing. However, it’s required for the Facebook Marketing feature.
Here’s how to set up the Facebook pixel for Shopify.
- Once you enable data sharing in the Customer data-sharing section, you’ll be able to manage your pixel under Data Sharing in the Facebook channel’s “Settings” section.
- Within “Data Sharing” you’ll find Customer Data Sharing—here’s where you’ll see any pixels you have created.
- Click Connect to connect a preexisting Facebook pixel
How to Change or remove a Facebook pixel from your online store
- In Shopify admin, click Facebook > Settings.
- Remove your current pixel under the Data Sharing Settings section.
- Connect the new pixel
- Be sure to remove any preexisting pixel code if you’ve previously edited theme code. You want to avoid having more than one pixel on your code, to avoid incorrect data.
One last word on the Facebook pixel; ideally you’d want to add this via Google Tag Manager along with all of your other pixels and tracking codes.
However, if you want to add the code quickly just add it to Shopify directly.
When to Use An Agency for Your Social Media Strategy
Now that we’ve shown you how to set up selling on Facebook or Instagram, the next step is ensuring you’ve got a creative and strategic social media plan in place.
If you don’t have a dedicated team or team member to work on implementing your social media, it’s worth considering working with an agency like Shero.
An effective growth-driven strategy should engage your target audiences, increase your brand awareness, drive traffic, and of course, sell more products.
A skilled social media agency should be able to help online stores successfully market their business and products across the right digital marketing channels.
Remember: Social Media is not one-size-fits-all and you don’t need to be on every network to be successful — just the right ones.
Want to work together?
Contact us with any questions, or to learn more about setting up a Shopify store.
You can also visit our Guide to Shopify Pricing to learn more about Shopify in general.
Gentian, CSO and co-founder of Shero Commerce, guides the company and client digital strategies. He's an expert in technical SEO, Inbound Marketing, and eCommerce strategy.


