Have a Magento 2 website and want to offer your clients a way to easily return products? If yes, in this tutorial you’ll learn how you can configure Return Merchandise Authorization (RMA) on your Magento 2 store.
First off, this is a built-in feature in Magento Commerce only, the paid version. Magento Open Source does not come with the RMA feature, but you can add it by using an extension like these ones from Mirasvit, Amasty, or Aheadworks.
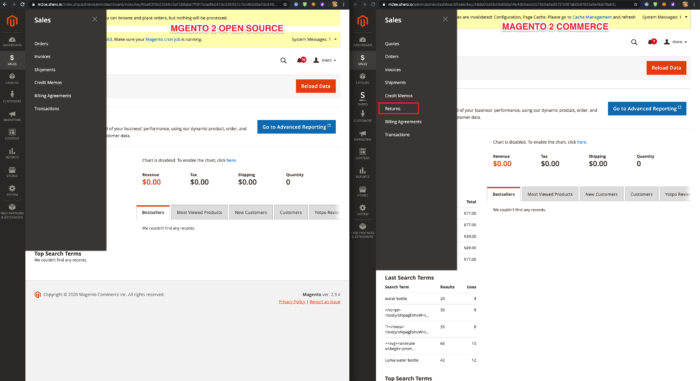
How Return Merchandise Authorization in Magento 2 works
Step 1: Customer Sends a Return Request (RMA)
The customer has to login to their Magento account to start the return. It does not matter if a client is registered or not. As long as they have placed an order on the website, and the order exists in Magento, both registered customers and guests can request an RMA. As a merchant, you also have the ability to initiate an RMA from the Magento Admin.
Step 2: Return (RMA) Issued
The merchant receives and reviews the RMA request submitted from the customer. After reviewing the request, you can authorize it partially, completely, or deny/cancel the request. If you authorize the return and agree to pay for the return shipment, you can create a shipment order from the Admin with a supported carrier.
Step 3: Customer Returns Merchandise
The customer gets notified about the merchant authorization for the return and follows your shipping instructions and returns the merchandise to you.
Step 4: Merchant Receives Merchandise
After the merchant receives the returned merchandise, you inspect the product/s and either approve the return partially or completely, or you can cancel the RMA altogether.
The great thing about RMA is that you can allow ALL products to be returned, or just allow specific products, conversely, you could also disallow the returning of specific products as well.
With RMA, you will also have the ability to approve or deny returns, with expanded functionality to choose how the customer’s return is processed. For example, you can give the customer “Store Credit” instead of a straight refund.
Magento takes a practical approach to returns, allowing you to accept part of a return in what is called “Splitting”. This means, if a customer returns two products at once, you can accept one product, but deny the return of the other product.
An additional feature of RMA is that you can even print the return shipping labels directly from the admin panel through integration with a carrier’s website.
Magento 2 RMA Configuration & Workflow
Magento has the following RMA configuration guide which provides some instructions. You can read their instructions and our instructions below.
Configuration:
To start with, you will want to go to:
Step 1: Stores > Configuration
Step 2: From here, you will want to select your Store from the upper left dropdown.
Then (expand) Sales > Sales Tab > RMA Settings.
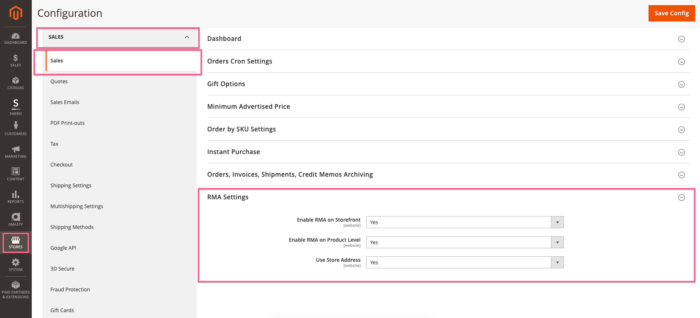
- Set “Enable RMA on Frontend” to “Yes”.
- Set “Enable RMA on Product Level” to “Yes”.
- If you would like returns to go to the store address, set “Use Store Address” to “Yes”, otherwise set it to “No”, and fill in the required fields.
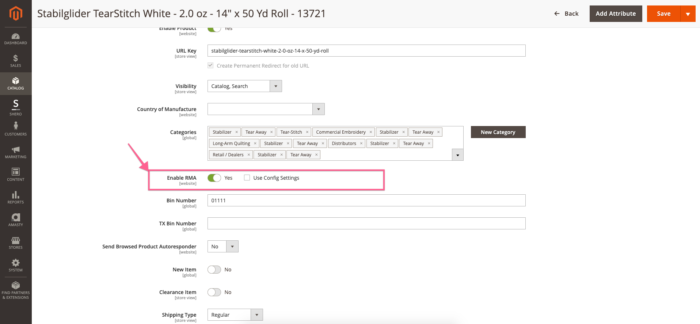
Step 3: If RMA is enabled on the product level, navigate to your products and you will now have a setting under the “General” tab that is “Enable RMA”.
The default is to use config, but you can disable it by selecting “No” for certain products if you wish.
RMA Emails
This will allow Magento to send customers emails at different stages of RMA Processing.
Navigate to: Stores > Configuration > (expand) Sales > Sales Emails > (expand) RMA tab.
You will find several Tabs “RMA”, “RMA Authorization”, “RMA Admin Comments”, “RMA Customer Comments”.
For each one, there is the ability to enable it, choose the:
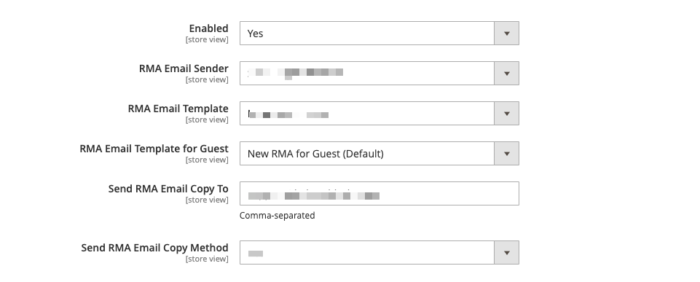
- RMA Authorized Email Sender (email@domain address).
- The template to use.
- The templates for guests (doesn’t apply to customer comments),
- A field to add addresses to copy the email to (CC)
- The way that the copy (CC) email is sent.
Shipping Methods For Returns
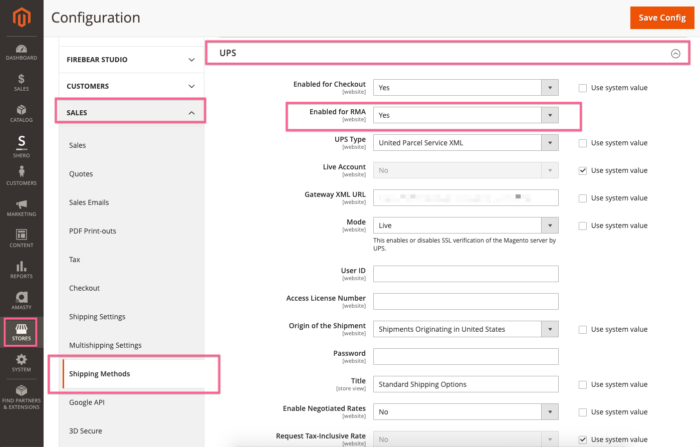
Stores > Configuration > (expand) Sales >Shipping Methods. Select the return service you wish to use, for this, we’ll use UPS.
Set Enabled for RMA to “Yes“.
RMA Attributes
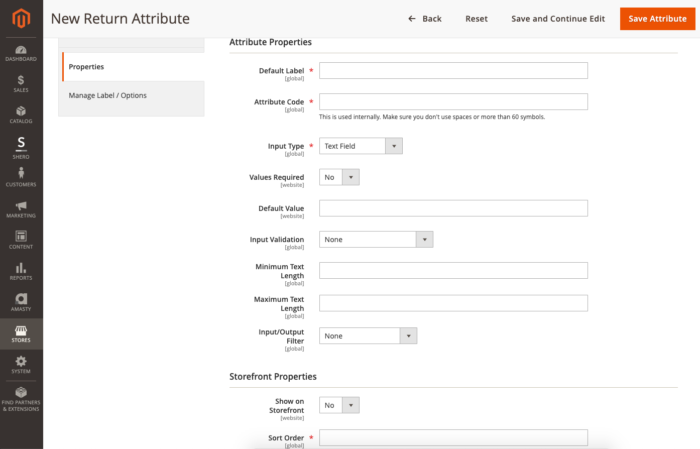
- Navigate to Stores > Attributes > Returns. Item Attribute. For this we will create an attribute field that will let the customer indicate if they would like a phone call to assist with their return process.
- Click “Add New Attribute”.
- Set “Show on Frontend” to “Yes” so that the customer may select it.
- Fill all required fields.
- Click “Save and Continue Edit”.
Click “Manage Label/Options”.

- Under “Manage Titles” fill in how the attribute will display in the admin.
- Click > “Save”.
Customer Order View
The customer can begin a return by going to “My Account” >”My Orders”. Next, they click on “View Order” for the order that they wish to view, and submit a return for. They will see a screen like this:
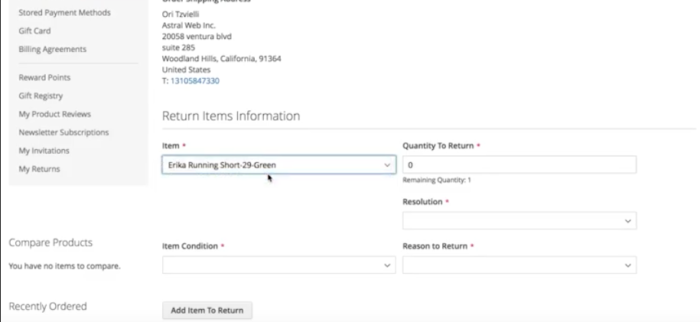
Then, they click on “Return” in the upper right hand corner and are shown form we created earlier.
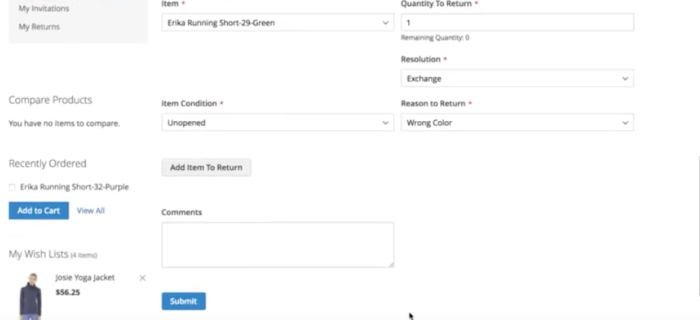
After they submit the form they will be able to view their return requests under “My Returns” tab.
In the admin, you will be able to approve return requests by navigating to Sales -> Returns
- To approve or deny or change the “way” a return is processed, click on “View”.
- We can add comments about Return.
- On “Returns items” we can see the items that can be returned.
- Click on “Submit Return”

Here you will also notice a “Split” link on this grid. With that, if a customer has requested to return multiple items, you can split the request and approve certain items, but not others.
Note: Guests can also return orders by click on “Orders and Returns” in the footer of the site:
They will then see this screen:
There are also three ways to place and return request in the admin area. I will list them briefly:
- RMA Managing Section,
- Order Management section from the Order View Page,
- Customer Management Section from the Customer View.
Generating Return Shipping Labels
After the return has been set to Authorized, go to the General Information tab. In the upper right, a new link should appear “Create Shipping Label”
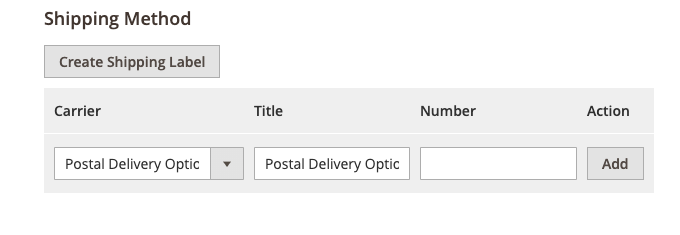
- A new Pop-up will appear.
- Select the shipping method you’d like and click “Ok”:
- From here, click “Add Product” button and enable the product by clicking the tick boxes for each product you want to generate the label for.
Click “Ok” and Magento will connect to the Carriers Website and Generate the Label which you can then print. To do this, click “Print Shipping Label”.
We hope you found this Magento 2 Return Merchandise Authorization tutorial helpful. Now you know how to configure returns on your Magento 2 website and provide your clients with a seamless experience.
Gentian, CSO and co-founder of Shero Commerce, guides the company and client digital strategies. He's an expert in technical SEO, Inbound Marketing, and eCommerce strategy.


